Finding an OS for the Pixel 2
While hardware is arguably the Pixel 2’s greatest strength, for anyone venturing off the beaten (and uninteresting) path of using ChromeOS, hardware can quickly become your greatest enemy. There are many things you have to get right:
- The ATMEL-based touchpad
- The ATMEL-based touchscreen
- Media Keys
- Control screen brightness
- Control keyboard backlight brightness
- How to deal with that enormous fucking screen resolution
- Find a distribution that you can easily install!
For many of these problems, I have found the Chromebook-focused GalliumOS to be extremely helpful. I used GaOS 1 on my Pixel for many weeks, and found it to be a very usable desktop environment.
The biggest problem was that the desktop manager was XFCE, and being constrained to GTK2 themes led to a very unpleasant UI/UX on the Pixel’s 2560x1700 resolution. After playing with as many parameters as I could find to try to tune the GTK2 themes to match the piece-meal font DPI scalings, I decided to try a few other distributions and see if anything else worked well out-of-the-box but was kinder in terms of HDPI UI.
The biggest problem I ran into was finding that most of my go-to plans could not even get off the ground! I burnt the latest .iso of both Ubuntu and Xubuntu (xenial) to an SD card. Both failed in the same exact way on boot – I would get an error about gfxboot. Despite this answer’s suggestion, I could not get any installer to run. This was a popular theme with other distros I tried.
Finally, I hit upon trying Linux Mint 18 “Sarah”, currently beta. This version of Mint is 16.04 based, and the installer boots on the Pixel 2!
So my solution to installing an up-to-date Ubuntu distro on the Samus is to install Linux Mint, and then replace the window manager and desktop with something I want, such as Unity. Not technically Ubuntu vanilla, but it works, and even better than Gallium did wrt touchscreen & HDPI thanks to the UI/UX upgrades in 16.04 Unity!
Installing Linux Mint
The very first thing we need to do is prepare some installation media with our Linux Mint image.
Download the Linux Mint 18 Image
First, download the Linux Mint 18 .iso, I used the Cinnamon version. Then, cd into your download directory.
Get an SD Card
Next, insert an SD card. You can use df -h to list your currently connected devices. Determine which corresponds to your SD card.
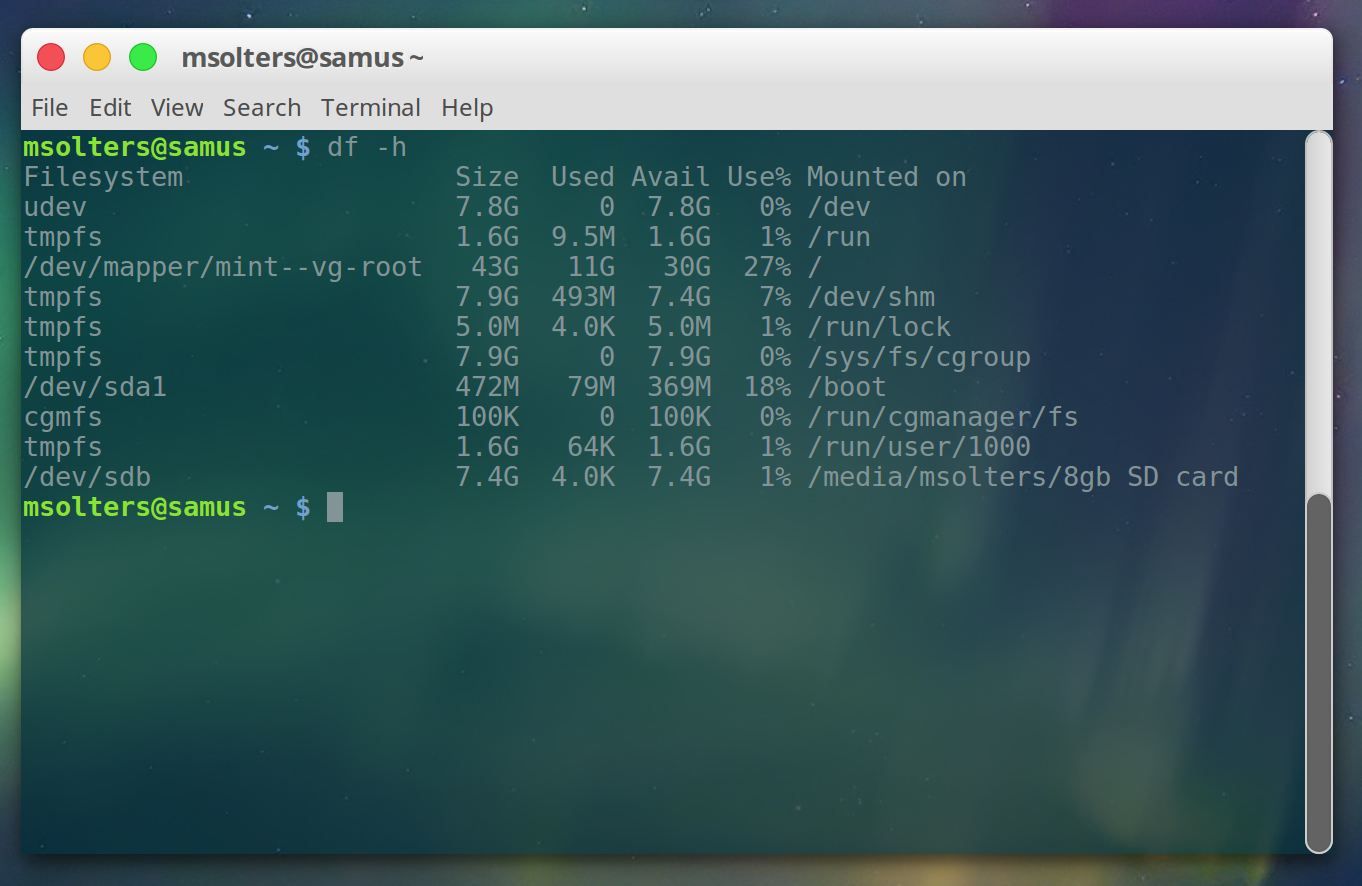
Now, for any mounted partition belonging to the SD card device, unmount it, e.g.:
sudo umount /dev/sdb1
sudo umount /dev/sdb2
Burn the .iso to SD Card
Finally, we are going to burn the Linux Mint .iso to the SD card. As you might expect, this SD card’s data will be forfeit so be careful! From the download directory, we burn the .iso to the SD card device we determined in the earlier step:
dd bs=1M if=linuxmint-18-image.iso of=/dev/sdb
This can take a while and there will be no output until it’s done.
Finally, sudo sync and remove your SD card.
Reboot the Pixel 2
Now, with the SD card in the device, reboot your Pixel 2. Use CTRL + L as if you were booting into Linux as per usual. But, when you get to the black-and-white SeaBIOS menu, press ESC. You will be presented with a menu of boot options; choose the SD card! Now you will be able to boot the Linux Mint live image. From here, simply follow the Linux Mint installer wizard!
Make sure to give the system a good
sudo apt-get update
sudo apt-get upgrade
Before proceeding any further.
Moving from Cinnamon to Unity
After following the Linux Mint installation process, you should be able to reboot right into the Cinnamon desktop. Cinnamon itself is a decent enough environment but it’s not my cup of tea. It does, however, just like Unity have a global UI scaling feature for HDPI situations like the Pixel. However, I really like the multitouch window management features in Unity, so this guide will continue on with replacing Cinnamon with garden-variety Unity desktop.
Install Unity
Googling around for installing Unity inside a Linux Mint installation, I found this result which does just what we want:
sudo apt-get install unity unity-scope-askubuntu unity-lens-applications unity-webapps-bbcnews unity-greeter ubuntu-desktop
sudo apt-get install --install-recommends indicator-applet-complete
Remove MDM
MDM is the default window manager for Cinnamon. We want to get rid of it, because even when not used it will interfere with our login screen (the ubuntu-greeter).
sudo apt-get remove mdm
Login with a Unity Session
From this point, we should be able to use Unity simply by restarting and then choosing a Unity session when we login again. unity-greeter should also replace Linux Mint’s default login screen with the familiar purple.
Scale UI
Now that we’ve got a working Unity desktop environment, the first thing we can do is scale up the UI to fit our HDPI display. Go to Displays and then use the “Scale for menu and title bars” slider to select a UI scaling factor:
![]()
Samus Kernel
Due to the unique hardware decisions made in the Pixel 2, there are several deficiencies which even the updates and improvements of 16.04 will not fix for us. Fortunately, there is an amazing GitHub repository called raphael/linux-samus containing fixes for almost all of these!
Clone the linux-samus repository if you haven’t already. It contains a special Linux Kernel specialized for the Pixel 2, as well as many helper scripts to get various pieces of hardware running more smoothly.
git clone https://github.com/raphael/linux-samus.git
Install Samus Kernel
The first thing we need to do is actually install the modified kernel. This is accomplished with a few .deb files:
cd linux-samus/build/debian
sudo dpkg -i *.deb
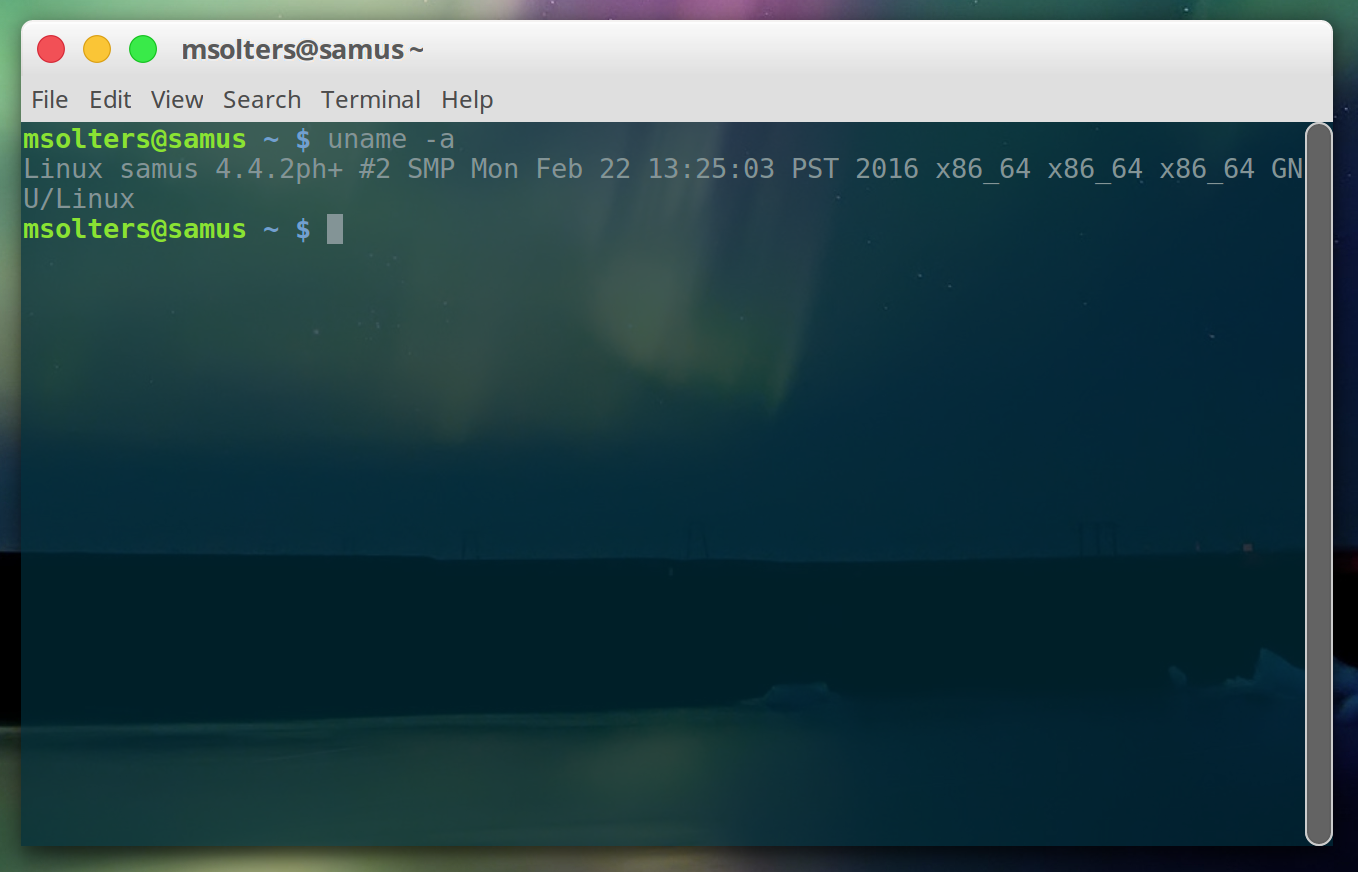
Finally, it is important that we update GRUB, otherwise we may not actually load the new kernel on reboot.
sudo update-grub
Finally, reboot. You can check if you’re using the new kernel by using uname -a. If installation was successful, you should see Linux samus 4.4.2ph+.
Sound (Output)
While the linux-samus kernel by itself allows you to see the onboard sound device, the bdw-rt5677, it doesn’t completely configure that device to be used for output:
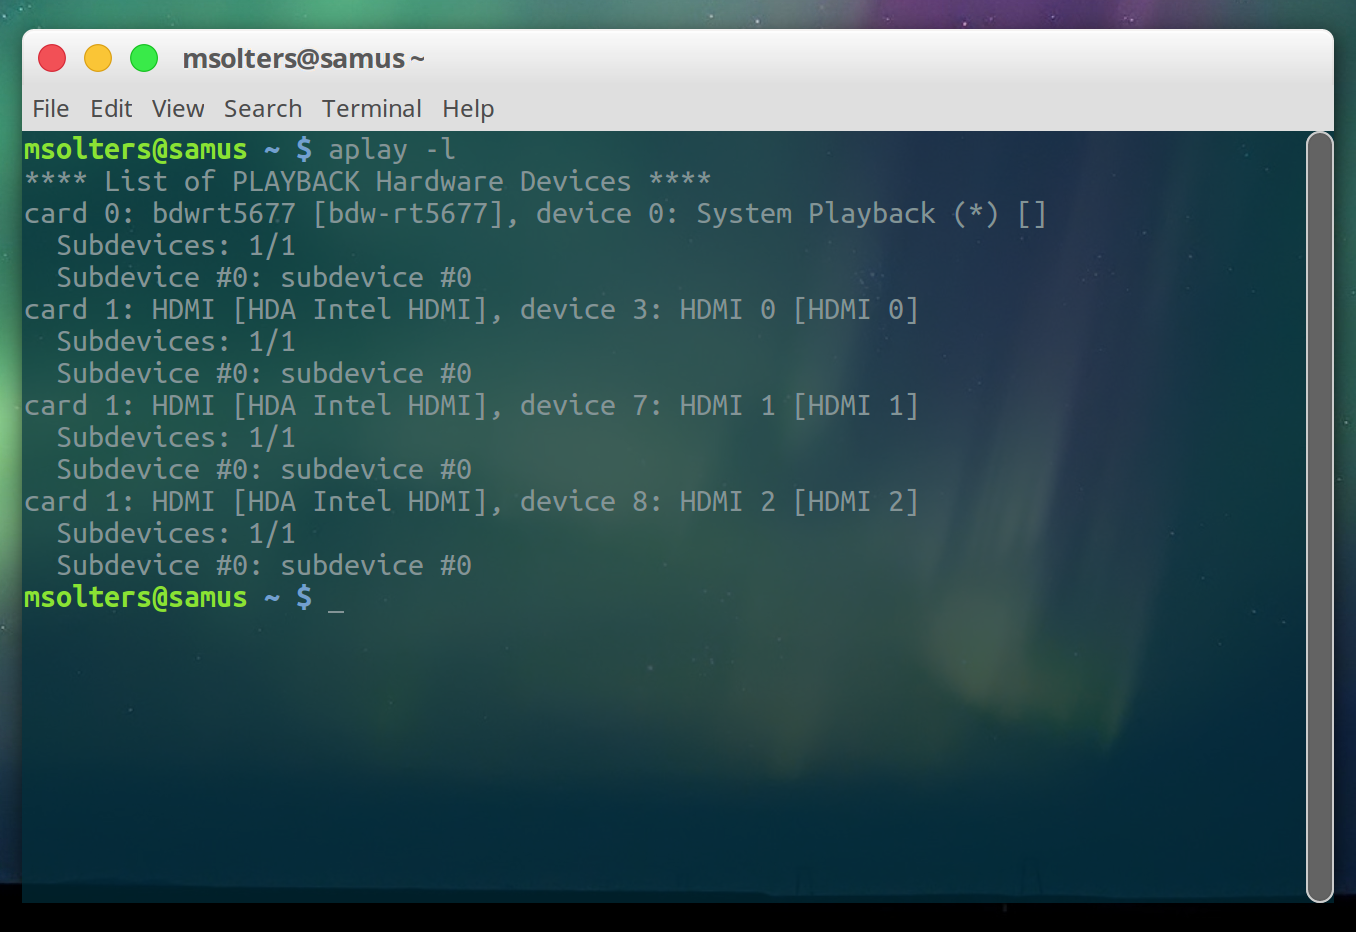
There comes a script with the linux-samus repo to automatically fix this.
Just run the sound.sh script:
cd linux-samus/scripts/setup/sound
./sound.sh
After this, you should find new bdw-rt5677 devices in your Sound settings:
![]()
Microphone
After running the ./sound.sh script, you should be able to add the microphone devices by running the following commands:
pulseaudio -k && pulseaudio -d
![]()
Touchpad
The Pixel 2 has an ATMEL touchpad. By default, Ubuntu will be using a Synaptics driver for this device. The linux-samus repo also contains a script with some improvements for the touchpad.
However, neither of these help as much as @hugegreenbug’s xf86-input-cmt drivers which were ported from ChromiumOS. There is a PPA; unfortunately, for 16.04 Xenial, we’re gonna have to roll our sleeves up and compile it.
xf86-input-cmt depends on two other packages, libevdev and libgestures. We’ll have to compile both of those as well. Make sure that you’ve installed sudo apt-get install build-essential first!
Compile libevdevc
This one is probably the simplest, in terms of dependencies.
git clone https://github.com/hugegreenbug/libevdevc.git
cd libevdevc

make
sudo make install
Compile libgestures
This library will require you to install some packages first.
sudo apt-get install libjsoncpp-dev libglib2.0-dev

git clone https://github.com/hugegreenbug/libgestures.git
cd libgestures

make
sudo make install
Compile xf86-input-cmt
Similarly, xf86-input-cmt has a unique dependency, this time on the X11 xorg_lib.
sudo apt-get install xorg-dev libx11-dev

git clone https://github.com/hugegreenbug/xf86-input-cmt.git
cd xf86-input-cmt

./configure --prefix=/usr
make
sudo make install
Disable Synaptics Driver
This step is perhaps the most important. If Synaptics driver is enabled, our new driver code won’t have any effect. To disable the Synaptics drivers, we want to rename the 50-synaptics.conf to anything that doesn’t end in .conf. This file is located in /usr/share/X11/xorg.conf.d.
You can also simply delete the .conf file. Your call.
Copy New Config Files
Now we need to copy over the new device configuration files for the xf86-input-cmt driver. These files come in the xf86-input-cmt/xorg-conf folder. We are going to be installing them the same /usr/share/X11/xorg.conf.d folder as where the Synaptics driver was. Assuming you are already in that destination directory, the installation instructions would be something like:
cp /path/to/xf86-input-cmt/xorg-conf/20-mouse.conf 20-mouse.conf
cp /path/to/xf86-input-cmt/xorg-conf/40-touchpad.conf 40-touchpad.conf
cp /path/to/xf86-input-cmt/xorg-conf/50-touchpad-cmt-samus.conf 50-touchpad.conf
Now, after a reboot, Ubuntu should begin using the provided driver instead of Synaptics. You’ll notice a reduction in unresponsive behaviour and unwanted cursor jumps.
Media Keys
The Pixel’s dedicated “media keys” will simply be interpreted as F1-F10 keys by Ubuntu. I’ve found the easiest way to get back to the original behaviour is simply to map the keys as shortcuts using the Keyboard settings dialog in Ubuntu:
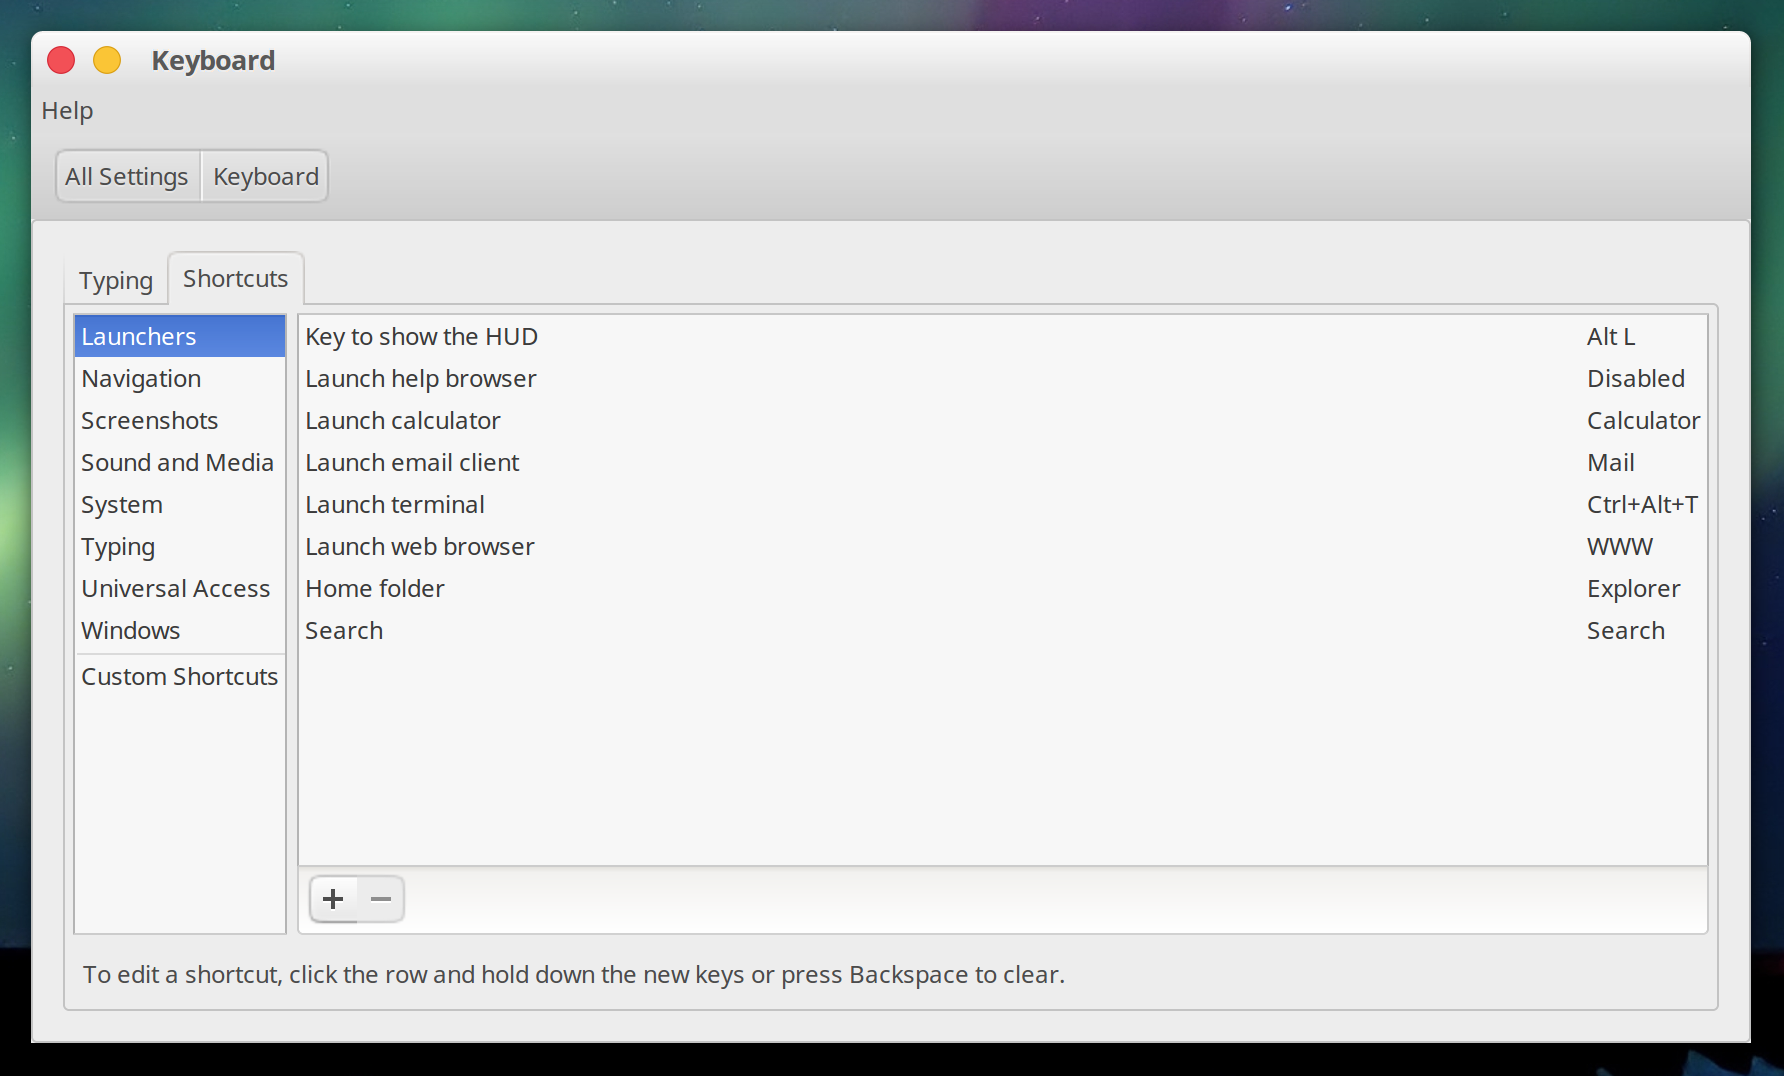
The actual actions we’re going to map to our shorcuts will be scripts which can be found under linux-samus/scripts/setup in various subdirectories.
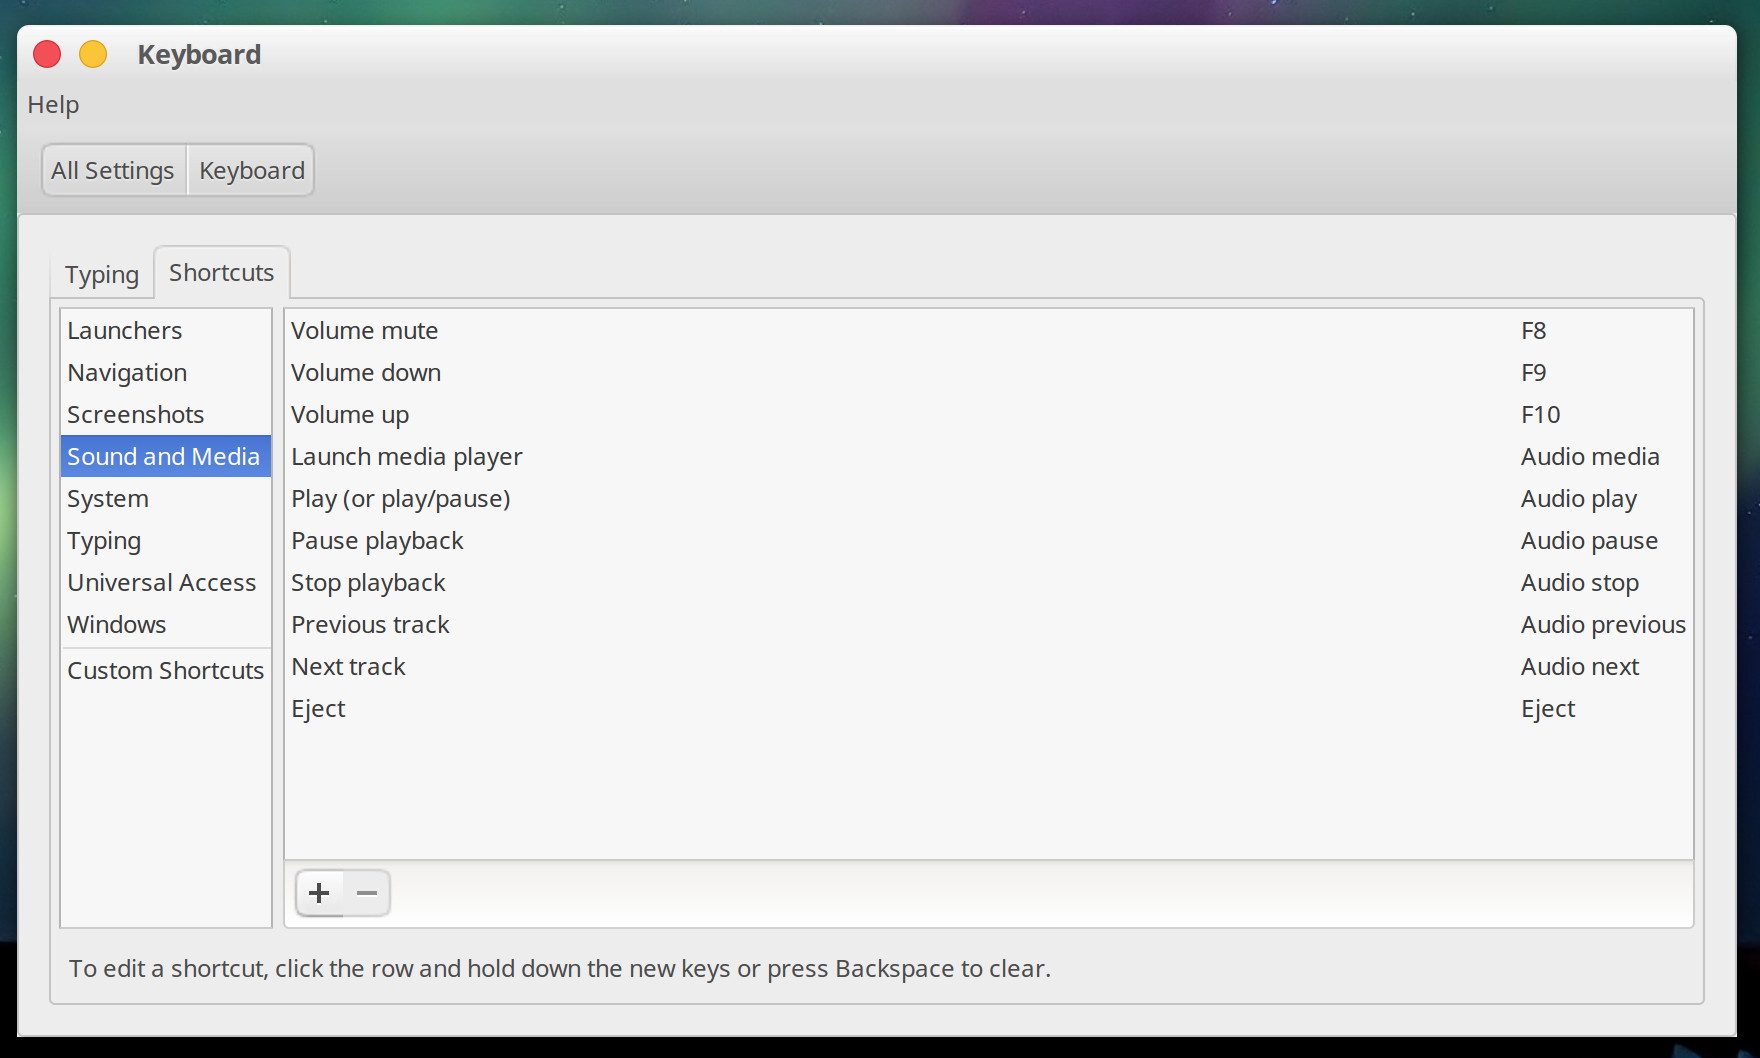
Volume
This one is the easiest, as it does not require any custom scripts. Simply navigate to “Sound and Media” in the nav list to the left in the Keyboard Shortcuts dialog. We’re just going to use F8-F10 as mute, volume down, and volume up, respectively.
Brightness
Increasing and decreasing the brightness of the screen will be mapped to F7 and F6, respectively. For the backlight of the keyboard, we will use ALT + - and ALT + =. The scripts for controlling brightness are located in linux-samus/scripts/setup/brightness/.
For the scripts to work, we need to apply the correct permissions to some system files on every boot first. That’s what the enable-brightness.sh script is for. To run enable-brightness.sh on every boot, just run
sudo ./setup.systemd.sh
You should also run sudo ./enable-brightness.sh once, so that you can test your keyboard shortcuts before restarting.
The commands brightness and keyboard_led are copied into /usr/local/bin by the setup.systemd.sh script!
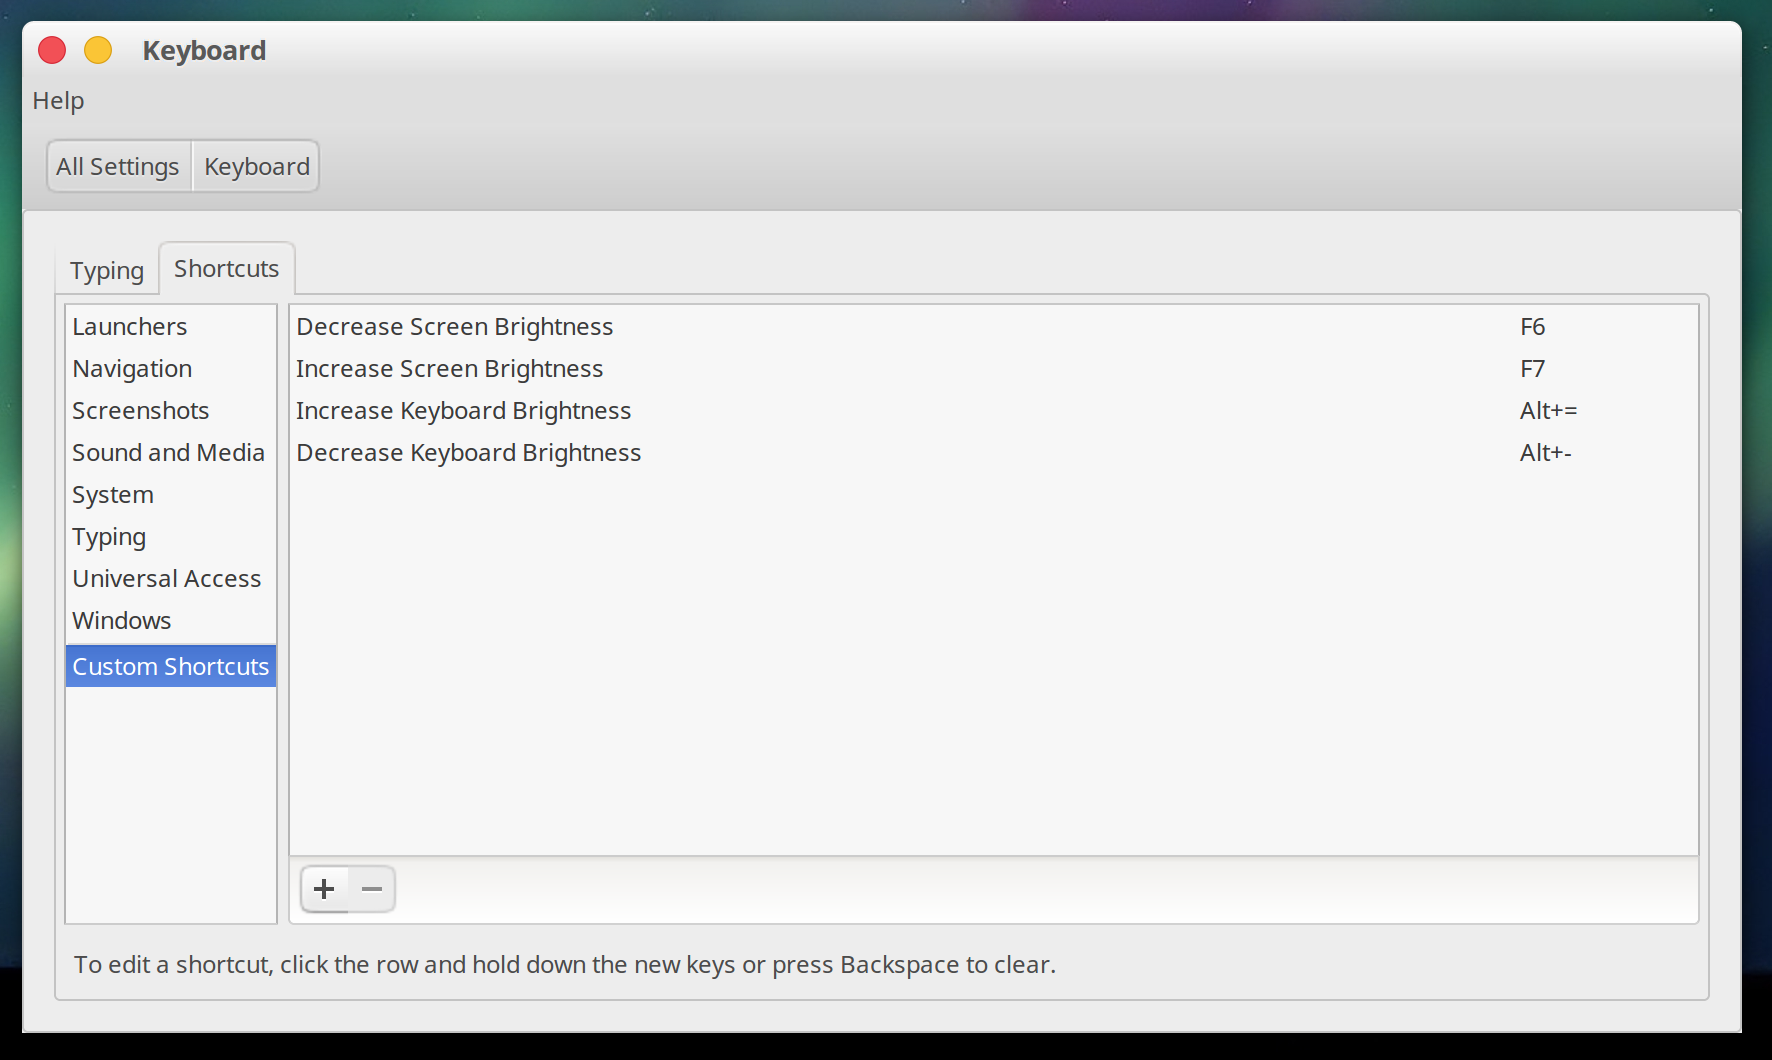
Now, we can establish our actual keyboard shortcuts:
| Purpose | Command | Key Combo |
| Increase Screen Brightness | brightness --increase |
F6 |
| Decrease Screen Brightness | brightness --decrease |
F7 |
| Increase Keyboard Brightness | keyboard_led --increase |
ALT + = |
| Increase Keyboard Brightness | keyboard_led --decrease |
ALT + = |