Brief
Here we are going to describe a process to manually build and flash a Linux distribution for a NextThingCo CHIP Pro. This means you can build e.g. a custom Debian image with specific packages, or even generate an image for a hard drive that is not 4Gb or 512Mb. In summary, we are going to use:
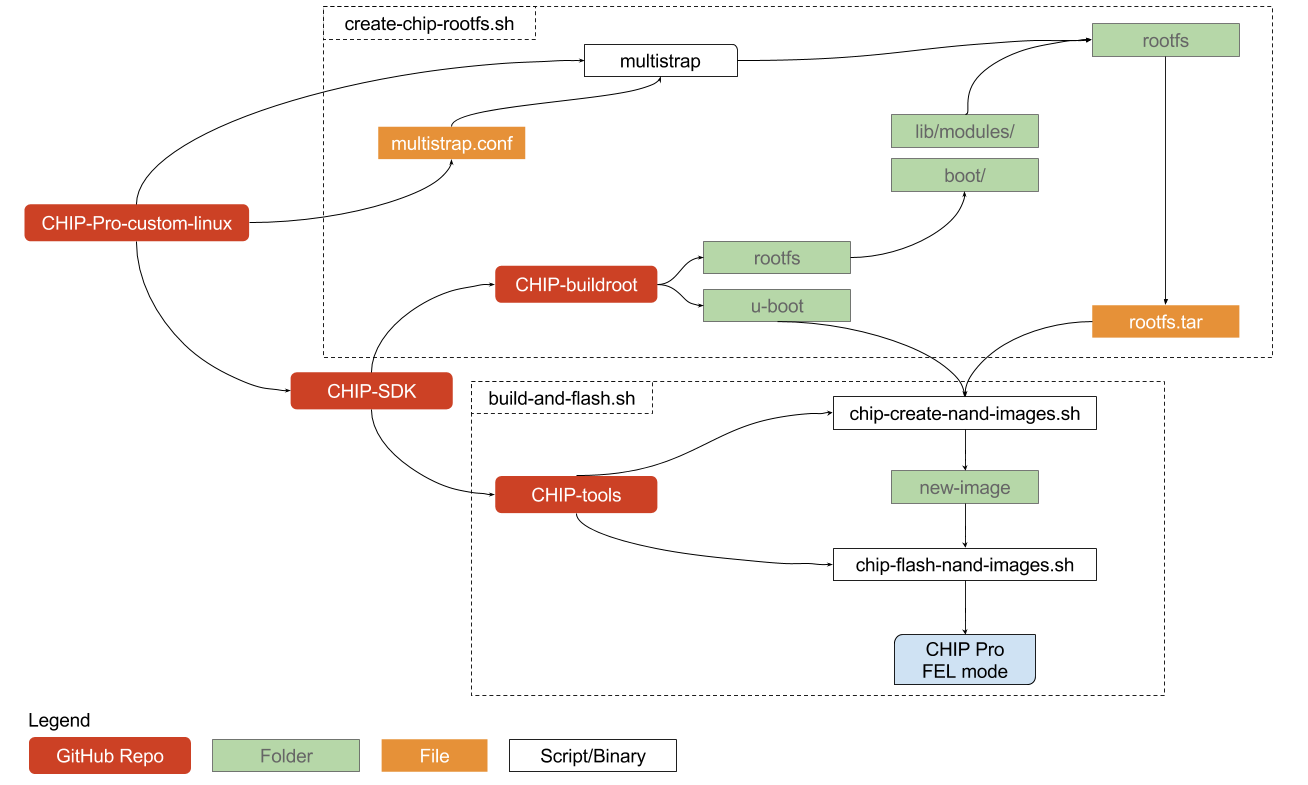
multistrap, to generate a custom Linuxrootfswith our target packagesCHIP-buildrootto get our CHIP Pro board-specific kernel + modulesCHIP-toolsto synthesize a NAND-ready image from the rootfs, kernel & module; then burn it to the CHIP Pro flash chip
This article will assume an Ubuntu or other Debian-based Linux host as the machine on which development is done. Mac and especially Windows users, may god have mercy on your souls.
Gather ye Ingredients
I have a small repository called CHIP-Pro-custom-linux that will download and install all that you’ll need to get started for a Linux development (“host”) environment such as Ubuntu 16.10.
Once you’ve cloned this repo, you can use the setup.sh script to install the rest of what we need:
git clone https://github.com/msolters/CHIP-Pro-custom-linux
cd CHIP-Pro-custom-linux
sh setup.sh # will need your password to finish installation
This will install the packages required for compiling and flashing the CHIP Pro, as well as NextThingCo’s CHIP-SDK and its constituent dependencies.
Once setup.sh can execute (without errors), we’re ready to get cooking!
CHIP-SDK
As you can see in the flow chart, the CHIP-SDK repository contains most of the software and information we need for flashing the NTC SoCs.
Ignore the
CHIP-SDKREADME’s claim about needing VirtualBox, Vagrant, or any of that noise. A native Linux host is perfectly sufficient for what we are going to do.
Part of setup.sh is to execute the setup_ubuntu1404.sh script from the CHIP-SDK repo. If you run into dependency issues early on, check out that script and what it attempts to do.
Create a Linux Image
We are creating our custom Linux images by first generating “root file systems” or rootfs directories, which are literally the / directories which shall form the skeleton of our target operating systems.
We are using the program multistrap to create our rootfs.
multistraptakes in a config file, and outputs arootfs
There are a few multistrap config files inside multistrap-config-examples/*.conf. More information about multistrap can be found in the documentation.
The provided CHIP-Pro-custom-linux/create-chip-rootfs.sh takes a multistrap configuration file as its only argument.
sh create-chip-rootfs.sh multistrap-config-examples/debian-netutils.conf
This will auto-generate two different rootfs directories:
- Buildroot
rootfs- Only generated if it is missing, as it is time consuming. This will give us the kernel (/boot) and modules (‘/lib/modules’) specific to the CHIP Pro. - Custom
rootfs- The customrootfscontaining whatever is specified in ourmultistrapconfig file.
Then, it will stitch these elements together into a single master rootfs.tar. If you want to get into the details on this process, read on. If you just want to put this software onto your CHIP, skip to Flashing.
Compile CHIP-buildroot
CHIP-buildroot is a fork of buildroot that will compile a root file system, or rootfs, optimized for the CHIP Pro hardware. This includes kernel modifications such as a device tree overlay corresponding to the CHIP Pro board.
One can use the vanilla
rootfscreated bybuildrootas the totality of their target Linux image. Butbuildrootis incredibly spartan.buildrootdoes not include any kind of package manager and is better suited for assembling an OS where the software is fixed. It is not ideal for prototyping!
We just need to compile CHIP-buildroot once to get a skeleton rootfs, from which we are going to pick out only the /boot and /lib/modules.
Compile Requirements
In my experience, GCC v6 will throw errors during the buildroot compilation. The most direct solution I have found is to make sure you have the GCC v5 binary, and then temporarily symlink the default gcc binary to point to gcc-5:
sudo apt-get install gcc-5
sudo mv /usr/bin/gcc /usr/bin/gcc.old
sudo ln -s /usr/bin/gcc-5 /usr/bin/gcc

# Make sure to undo these hacks when you are done, e.g.:
#sudo rm /usr/bin/gcc
#sudo mv /usr/bin/gcc.old /usr/bin/gcc
Compile
The actual compilation is simple. The make chippro_defconfig is basically going to overwrite CHIP-buildroot/.config with the CHIP-buildroot/configs/chippro_defconfig file.
If you’re feeling adventurous, the
.configcan be optionally modified further by using something likemake menuconfig.
cd CHIP-SDK/CHIP-buildroot
make chippro_defconfig
make # This can take a while!!
Decompress
When buildroot process is complete we will have a final rootfs.tar located in CHIP-SDK/CHIP-buildroot/output/images/rootfs.tar. Since we only want the /boot and /lib/modules, we are going to decompress this archive for later use:
mkdir /CHIP-buildroot/buildroot-rootfs
tar -xf CHIP-SDK/CHIP-buildroot/output/images/rootfs.tar -C CHIP-SDK/CHIP-buildroot/buildroot-rootfs
Generate Custom rootfs
Now we are going to use multistrap different tool to create another, separate, rootfs. multistrap allows us to create a more robust rootfs, containing almost any package we want out-of-the-box.
To accomplish this we first fill out a configuration file which contains details about the architecture, Linux distribution, and packages and sources we want to go into our new
rootfs.
Install multistrap
sudo apt-get install multistrap qemu-user-static live-build
Configure multistrap
Multistrap reads a config file that will determine the contents of our rootfs. We can use this config file to specify our distribution flavor, packages, sources, architecture and more. The following is a simple example that will build a plain Debian system, with a handful of useful networking and sysadmin utilities added in, for a big-endian ARM (armhf) architecture:
# multistrap-config-examples/debian-netutils.conf

# A slightly more complex example, comprising vanilla Debian
# with a few common utilities for armhf.

[General]
arch=armhf
cleanup=true
noauth=true
unpack=true
debootstrap=Debian Net Utils
aptsources=Debian

[Debian]
packages=apt kmod lsof
source=http://cdn.debian.net/debian/
keyring=debian-archive-keyring
suite=stable
components=main contrib non-free

[Net]
#Basic packages to enable the networking
packages=netbase net-tools ethtool udev iproute iputils-ping ifupdown isc-dhcp-client ssh network-manager
source=http://cdn.debian.net/debian/

[Utils]
#General purpose utilities
packages=locales adduser nano less wget dialog git usbutils passwd sudo
source=http://cdn.debian.net/debian/
Generate multistrap rootfs
This step will be much, much faster than the CHIP-buildroot compilation was. With our config file in hand,
multistrap -f multistrap-config-examples/debian-netutils.conf -d ./rootfs/
The output rootfs data will be located in ./rootfs/.
Configure and Complete rootfs
Once we have our rootfs data, however, it will require further configuration before it is bootable.
Copy over Buildroot Kernel and Modules
First, we want to get the /boot (kernel) and /lib/modules (modules) from the CHIP-buildroot output:
cp -r CHIP-SDK/CHIP-buildroot/buildroot-rootfs/boot/* ./rootfs/boot
cp -r CHIP-SDK/CHIP-buildroot/buildroot-rootfs/lib/modules ./rootfs/lib/
Fix Binary Permissions
Usually sudo (if you included it in your multistrap) and some other system binaries have incorrect permissions by this point, as we were assembling our rootfs as a regular user on the host.
sudo chown root:root -R /bin /usr/bin /usr/sbin
for FILE in /usr/bin/sudo /usr/lib/sudo/sudoers.so /etc/sudoers /etc/sudoers.d /etc/sudoers.d/README /var/lib/sudo
do
  chown root:root $FILE
  chmod 4755 $FILE
done
chroot into the target rootfs
Next, we are going to chroot into rootfs to complete some of our package configuration and userspace setup.
# enables armhf emulation
sudo cp /usr/bin/qemu-arm-static ./rootfs/usr/bin

# chroot into rootfs
sudo LC_ALL=C LANGUAGE=C LANG=C chroot ./rootfs
sudo mount -t proc nodev /proc/
Now, we can execute commands almost as if we were booted into our target machine.
Setup DNS Resolution
If you intend to do networking with your CHIP, it’s a good idea to set this so that network apps can resolve domain names.
echo "nameserver 127.0.0.1" > /etc/resolv.conf
Suppress Excessive Log Output
You may find that the CHIP outputs some annoying logs (such as the RTW WiFi driver) to the interactive console. This can be avoided by suppressing DMESG output:
echo "#!/bin/sh -e
#
# rc.local
#
# This script is executed at the end of each multiuser runlevel.
# Make sure that the script will "exit 0" on success or any other
# value on error.
#
# In order to enable or disable this script just change the execution
# bits.
#
# By default this script does nothing.

dmesg -D
exit 0" > /etc/rc.local
Complete Package Config
dpkg --configure -a
Note: Sometimes it’s best to do this one on the board itself, especially for packages that involve system devices: network, sound, etc. If this throws bugs for you, try running it later once you’re up and running on the CHIP Pro.
Create a New User
# Note: do this as root
adduser hero_of_kvatch
usermod -aG sudo hero_of_kvatch
Change Root Password
# Note: do this as root
passwd
Compress the rootfs
Finally, we just need to compress the rootfs contents into a .tar archive. Exit the chroot (exit until you’re back to your host). Then:
cd ./rootfs
tar -cf ../rootfs.tar .
cd ..
Now we have a rootfs.tar. We are ready to build and flash a NAND image.
Remove Emulator when Done
When you’re done poking around in the chroot you can remove the ARM emulator binary. Remember, file space on the CHIP Pro is precious!
sudo rm ./rootfs/usr/bin/qemu-arm-static
Flashing
Now that we have a final rootfs.tar, we need to:
- Build: Combine
rootfs.tarwith a bootloader (uboot) to create a final image - Flash: Burn that final image to the CHIP Pro flash IC
CHIP-Pro-custom-linux/build-and-flash.sh will automate both of these steps. If you want more details on each of these steps, check out the following two subsections.
Building the NAND Image
CHIP-tools provides a script to perform this step directly, chip-create-nand-images.sh. It requires three arguments:
- Path to CHIP Pro bootloader (
CHIP-SDK/CHIP-buildroot/output/build/uboot-nextthing_2016.01_next) - Path to target
rootfs.tar - Final image output directory (
new-image/)
CHIP_TOOLS_PATH="CHIP-Pro-custom-linux/CHIP-SDK/CHIP-tools"
UBOOT_PATH="CHIP-Pro-custom-linux/CHIP-SDK/CHIP-buildroot/output/build/uboot-nextthing_2016.01_next"
ROOTFS_PATH="CHIP-Pro-custom-linux/rootfs.tar"

cd CHIP_TOOLS_PATH
rm -rf new-image # delete any old image
sudo ./chip-create-nand-images.sh $UBOOT_PATH $ROOTFS_PATH new-image
Flashing the NAND Image
This step is simpler, but requires manual user intevention on the hardware side to stay in FEL mode. Once we have a new-image/ directory (see previous step), the software command is:
sudo chown -R $USER:$USER ./new-image # ensure usable data permissions
./chip-flash-nand-images.sh new-image/
Then, while holding down the FEL button on the CHIP Pro, connect it to the host PC’s micro-USB cable. After the first FEL......OK message, continue holding the FEL button; this should happen twice. Once the flasher says it is “writing” to the UBI FS, you can then safely let go of the button.
If you let go of FEL too soon, the flash will most likely time out looking for the CHIP Pro.
What About Customizing Linux Kernel/Modules?
What if you need CDC-ACM drivers enabled for the CHIP Pro, or other kernel modules?
The CHIP-linux repository is cloned and compiled for you automatically as a step of the CHIP-buildroot compilation. If we want to tweak what modules our CHIP Pro kernel will include, we need to override the default Linux config of CHIP-linux.
CHIP-buildroot/configs/chippro_defconfig:
...
BR2_LINUX_KERNEL=y
BR2_LINUX_KERNEL_CUSTOM_GIT=y
BR2_LINUX_KERNEL_CUSTOM_REPO_URL="https://github.com/NextThingCo/CHIP-linux"
BR2_LINUX_KERNEL_CUSTOM_REPO_VERSION="nextthing/4.4/chip"
BR2_LINUX_KERNEL_PATCH="wext_priv.patch"
BR2_LINUX_KERNEL_USE_CUSTOM_CONFIG=y
BR2_LINUX_KERNEL_CUSTOM_CONFIG_FILE="$(TOPDIR)/board/nextthing/chippro/linux.config"
BR2_LINUX_KERNEL_ZIMAGE=y
BR2_LINUX_KERNEL_DTS_SUPPORT=y
BR2_LINUX_KERNEL_INTREE_DTS_NAME="ntc-gr8-crumb"
BR2_LINUX_KERNEL_INSTALL_TARGET=y
BR2_LINUX_KERNEL_TOOL_CPUPOWER=y
BR2_LINUX_KERNEL_TOOL_PERF=y
By overriding BR2_LINUX_KERNEL_CUSTOM_REPO_URL or BR2_LINUX_KERNEL_CUSTOM_REPO_VERSION, you can cause CHIP-buildroot to use a custom CHIP-linux fork. If you wish to compile code from a local source, simply replace BR2_LINUX_KERNEL_CUSTOM_GIT=y with BR_LINUX_KERNEL_CUSTOM_LOCAL=y. (Again, refer to the makefile)
You can use
make menuconfiginside theCHIP-linuxrepo to quickly view or edit the kernel modules graphically.
Then, just make CHIP-buildroot again.
References
Most of what I have pieced together here is from what I have learned on the NextThingCo forums:
- Appropriately-named NTC forum user “Chipper” documents the many trials and tribulations along the path to enlightenment
- Bootstrapping a Distro for C.H.I.P. (Wiki)
- The Light at the end of The Tunnel
- Flashing Buildroot (Wiki)
- More Mutterings
As well as various blog posts, articles and SO answers: